Pages

Tuesday, 26 March 2013

The way to Your Heart.........Writing in Chocolate

How do I know you love me......


.....you indulge me when I hop from one foot to another wearing two different shoes asking 'which one goes better'?

.....you cover me with a blanket when I fall asleep on the sofa on a Sunday afternoon

.....you wait at the finish line of the half marathon in the pouring rain proud, soakng wet holding my kit bag and cheering me on because you know how tired I will be

.....you will drive to the garage in your pyjamas to buy me Love Hearts because I am obsessed even though the man there clearly thinks you are a bit 'Little Britain'!

Last week I found myself looking for a way to say thank you for your unwavering support over a difficult few months and helping me find the answers......a heartfelt thank you that wasn't about spending money but doing something that took a little bit of my time and imagination to show you how I feel.  I took a leaf out of your book - why use 100 words when 5 will do - only I took it a step further and wrote it on a biscuit.....because love often needs very few words to be truly expressed.

Recipe for vanilla biscuits

110g unsalted butter (room temperature)
55g caster sugar
170g plain flour
1/2 vanilla essence


Preheat the over to 180 degrees and cream together the butter and sugar on a low setting on your mixer until a sandy texture is obtaining and the ingredients a thoroughly combined.  Stir in the flour and bring toegether into a soft ball.

Cover and place in the fridge for about 15 minutes and then roll out your dough on a lightly floured surface (making sure your flour the rolling pin as well).  Then using your heart shaped cutters stamp out as many biscuits and then re-roll out any remaining dough to stamp out a few extras!  You can either keep them all the same size or like me use a variety of sizes - just remember to keep an eye on them when cooking as some may need a little less time.


Pop onto a baking sheet and cook in the oven for approximately 10 minutes or until just golden brown.  Remove and leave for a few minutes to cool slightly beofre transferring onto a wire rack to cool completely before decorating.

Chocolate Writing

Now for the fun bit......decorating the biscuits.  I used a bar of Green & Blacks dark chocolate, break up into chunks and place in a disposable piping bag and roll over the top.  Then place this into a bowl of hot water to let the chocolate melt. 


Once ready to use snip a tiny piece of the end of the bag and then angle to bag down to write, gently flicking up each time you want to stop.  Practise first on a plate if easier and if the chocolate starts to harden at any point just pop it back in the bowl to soften. 


Friday, 15 March 2013

Red Nose Day - Two Tone Icing & Twice The Fun!

I have a couple of weeks at home which meant I had plenty of free time to bake for this great cause.  Also this Sunday I run the Reading Half Marathon so surely an excuse to be able to eat a little bit extra - I will need to build up those energy stores (although not sure that cake is the way forward)!

So the plan is that friends and family will all donate in exchange for cake - they are all very easily bribed for food.......and any money raised will go to Red Nose Day, every little helps.....


The recipe I used was a basic vanilla sponge as used in previous posts (see red velvet cupcake recipe) and the frosting was a double batch of the normal recipe I also use;

500g icing sugar
160g insulated butter (room temperature)
50ml whole milk
1/2 tsp vanilla extract

Combine the sifted icing sugar with the butter until well mixed and then add in the vanilla extract & milk before turning the mixer up to a high speed for 7-8 minutes.

I think using two tone icing gives a great effect on these little cakes and it,s really easy to do - the trickiest bit is getting the two colours of icing into the bag.  Start with your disposable piping bag and a wide star nozzle and put the bag into a tall glass pulling the edges of the bag over the top of the glass freeing up your hands for the next part.  I had split the icing into two and coloured half of it red and then using a spatula put the red icing into one side of the bag pushing down towards the nozzle. Once you have put all the first colour in the bag then place the white colour into the other side - take the piping bag out the glass and then if there is a gap towards the nozzle with one colour gently push that side down using your hand.


Initially a single colour will only come through so either pipe into a bowl or use this as the centre stars on the middle of your cakes as this will be covered once you finish icing.  Finally, top off with a red m&m and enjoy sharing to raise some money for charity.


Sunday, 28 October 2012

Stoptober Madness - Twisting Vanilla Biscuits


So I have too many bad habits to list but the worst one in the view of society and for my health is being a smoker!  

When I first heard about Stoptober it seemed like the perfect opportunity to join in a mass attempt to quit once and for all. Now I am not normally one to be a sheep and do what everyone else is doing but the time had come to part company from this evil habit and felt like it would give me the support mechanism needed.  Also, I needed to do this once and for all - the smart part of me knows there is nothing positive about smoking and yet I continue to foolishly allow it to have a part in my life – it takes my money and will slowly strip me of my health, it was time for me to take control and firmly kick it into touch once and for all.

So, 1st October arrived and armed with a bucket load of willpower, a stress ball on my desk, a punch bag in the garden & friends and family pre-warned, I put my social life on hold and the house on lockdown and the challenge began.  

One thing that became clear very quickly was the need to keep myself busy, so weekend mornings started with long countryside runs, I've ticked off a huge list of jobs I've be meaning to get done pre-winter - painting radiators, picking out tiles for the bathroom, sorting out clothes for the charity shop and of course losing myself in the kitchen.  

This month I have baked pies, biscuits, cheesecake, cupcakes &puddings - family and friends happy to receive plates and boxes full of the successful results as I currently seem to think I am cooking for a football team in my pursuit of a successful Stoptober.  However, they are probably secretly cursing me as I inadvertently add to their calorie count pre-Christmas!


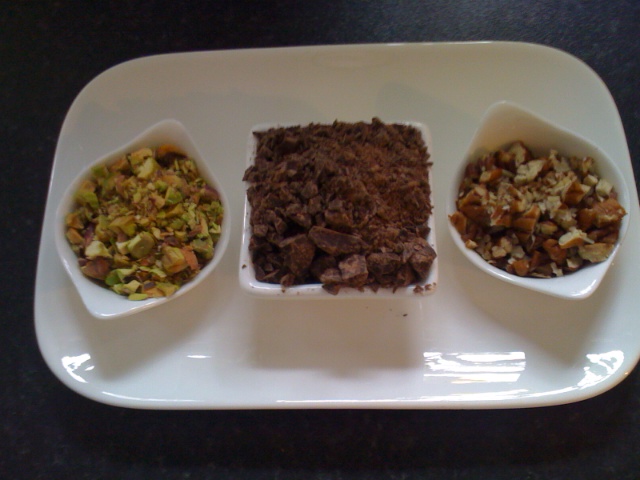
This week though the plan was to bake just for us though and fill the cookie jar with biscuits for the week, taking a tried and tested vanilla biscuit recipe and adding some flavours and textures to liven them up a little.  Using whatever was to hand in the cupboard and needed using up - pecans, pistachios along with my faithful friend Greene & Black's dark chocolate.

Both these nuts work so well with the chocolate and give a wonderful added bite to the biscuits and a great aftertaste - quick and easy to make and another afternoon successfully filled, a jar of homemade biscuits in the kitchen & ME 1 - CIGARETTES 0!!!

Recipe

200g unsalted butter (room temperature)
1/2 tsp vanilla extract
220g light brown sugar
1 egg
260g plain flour
1/2 tsp bicarb of soda
100g dark chocolate (roughly chopped)
30g pecans (roughly chopped)

Start by chopping your nuts and chocolate and put to one side and pre-heat the oven to fan assisted 150C.

Put the butter, egg, brown sugar & vanilla extract into the mixer and beat until light and fluffy.  Fold in the flour and bicarb a couple of tbsp at a time.  Split the dough into two batches and add half the chocolate and one type of nuts to each - stirring in thoroughly.

Roll a table spoon of the dough into balls and place on a baking sheet leaving approximately 3cm between each and bake in the oven to 14 minutes.    When ready removed from oven and leave for a few minutes before placing on a wire rack to cool completely. Each batch of dough makes about 15 biscuits.


Disclaimer: No-one was hurt in the making of these biscuits - that would have been week 1 of Stoptober and this is the end of week 4....

Sunday, 7 October 2012

Autumn Falls - Blueberry & Blackberry Cupcakes

Autumn is upon us - 5 reasons how I know;

1. The BBQ cover is on and the slow cooker is out the cupboard
2. The fire is getting lit in the evening
3. My feet are now encased in slipper boots 
4. I've started a Christmas Pinterest board
5. Muddy hunters are back in the boot of the car as my dog walking essential


Every year it catches me out, was it only a couple of weeks ago I was enjoying a lazy Sunday pub lunch with friends, the heating was off and the windows open?  I'm not really a fall girl but I always try to embrace this time of year, after all it's an excuse to buy lots of new knitwear and get excited about the impractical boots I don't need but will buy anyway.

It's also a great excuse to be in the house baking and with so many great autumnal ingredients around us time to get busy  in the kitchen.  At the moment the fruit coming into season is blackberries - which always bring back great childhood memories of trawling hedgerows with buckets and coming home with full stomachs and crimson finger tips.

Until now my use of fresh berries in baking had been limited to using them to create simple yet eye catching toppings or using them in the sponge only to be disappointed when it all sinks to the bottom and leaves it a bit soggy.  

Always keen for a new challenge I have been pulling together ideas on this for a while now and given the time of year - blackberries seemed a great staring point.  I thought they would create a great colour to work with and wanted to combine them with another fruit though, blueberries seemed the natural fit.

Whilst I love using high quality vanilla extract in cooking, I often find fruit essences synthetic in taste when compared to the real thing.  What if I could incorporate fresh berries by pureeing and sieving - retaining the burst of the fruit taste and create a vibrant colour frosting using only fresh fruit.


This really was trial and error, the recipe was pulled together from reading various books and I just added the fruit until the consistency of the batter looked right.  I opted to puree but not sieve it - this seemed to give the sponge a more dense and moist texture.  It also gave me the excuse to use the blender attachment on my mixer which has been sat in the box until now.


For the sponge;

212g plain flour (sifted)
1/2 tsp baking powder
pinch salt
40g blueberries & blackberries (pureed)
2 medium eggs
110g unsalted butter (room temperature)
150g castor sugar
66g light brown sugar
3 fl oz buttermilk
1/2 tsp vanilla extract

Cream together the butter and both sugars.  Combine the eggs and vanilla extract in a jug and on a slow speed add slowly to the mixture until fully incorporated.  In a bowl combine the pureed berries & buttermilk, and in another put the flour, salt & baking powder.  Then  alternate adding them in the mixer, small amounts at a time until everything is fully incorporated.

Spoon into cases and bake at 170 degrees (non-fan assisted) for 20-25 minutes, or until sponge bounces back when touched.  Set aside on a wire rack to cool.

For the frosting;

250g icing sugar (sifted)
80g unsalted butter (room temperature)
25ml pureed and sieved blackberries
2 tsp whole milk
few drops vanilla extract

Put the icing sugar and butter into the mixer and combine well.  I sieved the pureed fruit to give a smoother texture as I wanted to pipe the frosting.  With the mixer on a low speed add this a small amount at a time along with the vanilla extract until full incorporated.  This gave a really vibrant colour and a wonderful taste.

Once frosted top with extra fresh berries and a couple of silver dragees.


The smell from these cakes is divine, every time I walk into the kitchen I catch the scent of fresh berries.  I usually can't eat a whole cake and leave that to my chief taster but I happily wolfed this one - it is so moist and retains the fresh taste of the fruit perfectly. I savoured this frosting on my tongue, literally an explosion of berries - so much better in my opinion than a bottled essence.  I am assured they are "the best ones you've baked yet and a little bit of heaven".
Really keen to try this using raspberries and strawberries next, it seems to be a great way to infuse the fruit through the cake and the frosting, keeping it natural and without the disappointment of the dreaded 'soggy bottom'.......

Tuesday, 25 September 2012

Graduating to bigger things - The 4 Tier Ombre Cake


OMBRE - adjective (of a fabric) having a dyed, printed, or woven design in which the colour is graduated  from light to dark.   


  • Looking at the above definition it was a graduation in two ways for me.  I was finally taking on the the graduating layers of sponge and also I have recently spent my time baking small offerings of cupcakes and biscuits, it was time to step up to the plate and bake a party size cake.

    A friend is in the throws of organising a party and so we'd been having conversations about the perfect cake to serve up   There had been much debate on colours and flavours of the cupcakes that should be served but the bigger search had been for a large cake to take centre stage, the cupcakes were the mere pawns in this plan.

    Now this person has an eye for effortless style, everything she pins is stunning and then she sent me a link, entitled "The Perfect Cake" and to be fair it really was. A blue Ombre cake, simply iced in white and finished with a pallet knife.  

    I've been a fan of this cake for a while but never had a reason to bake one but I said I would have a go at one to see easy they were to tackle. I had a big family lunch on the Sunday so figured we could at least make a decent attempt at polishing off a good chunk of it it one sitting.

    I  set aside the morning to take over the kitchen, I had a feeling this was going to take some time to complete (3 hours it turned out).  Stereo turned up & ingredients purchased - I began.  I had decided on a four tier cake shaded from red through to cream.  The filling was to be a Summer Berry conserve and a Pink Champagne & Strawberry fresh cream (purchased from Marks & Spencer's and not home made).  All eventually to be iced with a vanilla frosting.  

    I started with the batter for the four sponges. You will need;

    450g butter (room temperature)
    450g caster sugar
    8 medium eggs
    3 tsp vanilla extract
    450g self raising flour (sifted)

    First, prepare four 7 inch cake tins oiling with melted butter and lining the base with grease proof paper.

    Then cream the butter and sugar in the mixer with a paddle attachment.  Beat the eggs & vanilla extract in a jug and add a little at a time with the mixer still on a slow speed.  Then finally fold in the flour a tablespoon at a time.

    Now for the fun part .......split the mixture into four bowls and colour.  I used a red colouring for the the bottom two layers to achieve a bright red and a vibrant pink.  The third layer was coloured using a pink liquid to achieve a subtle shade and the top layer was left it's natural colour.  Spoon into cake tins and bake for 20 mins at 180 degrees (non-fan assisted) for 20 minutes or until the sponge springs back when touched. 


    Leave for 5 minutes to cool slightly and then turn out onto wire racks and remove the paper, leaving to cool completely.

    For the butter cream;

    625g icing sugar (sifted)
    200g unsalted butter (room temperature)
    62 ml full fat milk
    1/2 tsp vanilla extract

    Beat the icing sugar and butter together on a medium speed, until well mixed.  Turn the mixer down to a slow speed, and having combined the milk and vanilla in a jug - slowly add to the mixture.  Once the liquid has been fully incorporated turn the mixer up to a high speed and continue to beat for approx. 7 minutes.

    Finally, I was ready to piece it all together - a bit like assembling a small tower, I was nervous at this point.  I started with the darkest layer first and covered the top with half of my Pink champagne cream.  


    I then placed the dark pink layer on top and over this spread the summer berry conserve, and then continued with the pale pink layer.  Another layer of the remaining cream - and finally the vanilla sponge.  I had sliced the tops off each of the sponges to give a flat top to work with making it much easier to stack up a solid looking cake that didn't look like it would topple over at any moment.


    I wanted to pipe the frosting which is why I had opted to mix up a more generous batch.  I started by putting a rough coating on the top as I wanted to add sliced fresh strawberries.  The piping of the sides was a mammoth task and I found my hands were making the piping bag warm and softening the frosting so I tried to work quickly and had to take a couple of breaks.


    The finished cake turned out much better than I expected for a first attempt and the wait to cut into was two much too bear, I was desperate to see the overall effect once it was served.  


    It went down a storm at lunch and makes a real impact on the centre of the table. Serve with extra fresh strawberries, and of course the best bit is the surprise when everyone gets served a slice and they're not expected the layered effect.


    I think my favourite part of this recipe is that the colour, flavour and icing options are endless as are the toppings. It can be altered to suit every occasion and it was so much fun to put together because there are no rules to follow - you bake it to suit you.  This will be making regular appearances on my baking list, perfect for friends' birthdays and I have been now been enrolled to do one for a wedding!  Just be warned - you need plenty of friend's around to share this as it really is a monster of a cake!


Thursday, 20 September 2012

Quitting without a plan - Red Velvet Cupcakes

Several years ago I made the decision to walk away from a long term career, whilst it had been good to me I was terrified of becoming institutionalised and felt burnt out. A trip to Australia had made me re-evaluate what I wanted from life and the simple answer at that point was I really didn't know.  I knew that I didn't want to continue on that path, seeming to endlessly cancel social plans at the last minute due to work commitments. Having recently become a god-mother and an Aunt I wanted the time to spoil them.  A work life balance re-assessment was needed.

Leaving my job without a plan felt like the scariest thing in the world - standing on the edge of a high cliff and preparing to jump yet at the same time the most liberating decision I'd ever made.  For the first time I had no responsibilities, yet surprisingly after the initial euphoria I felt a little aimless.
For the next year I needed a 'Try it' list (you can take the girl out of corporate but you can't take corporate out of the girl) , there were the usual things on there - travel, books I meant to read, write a travel journal, learn golf, run a half marathon and top of my list learn how to bake a cupcake.  


More specifically a Red Velvet cupcake - where did this come from? I had never really been known for my prowess in the kitchen - far more likely to be found filling my wardrobe than the kitchen cupboards.  I didn't even know what half the buttons on the oven did and not once had I outwardly expressed an interest in doing this, although I had always secretly admired these little heavenly culinary creations.

So off I went and bought books, ingredients, tins & cases - I read and spent hours making a mess and experiencing the successes and failures of a VERY novice baker.  Finally the chance to try new things and be creative, something my career choice hadn't required.  Family and friends were encouraging and my confidence to experiment increased.  I was well and truly hooked.....


I went off and did the travelling which meant I had the time to plough through the huge list of books I'd meant to read and write the travel journal. I ticked off most other things on my list - ran a couple of half marathons (probably to burn off the additional calories I was now consuming with all the baking) and made a poor attempt to learn golf.  Surprisingly, the one that stays with me the most is the baking and I always end up coming back to cupcakes.


So I found myself back in the kitchen (as I am most weekends now) to tackle my nemesis the red velvet - this is the one recipe I have never managed to get right, having never achieved the vibrant red colour.  They've always come out a reddish/brown and not that divine shade that makes you want to sink your teeth into them.


Undeterred I was armed with a revised recipe and a high quality colouring......it was time to deliver as I had promised to take these into the office on Monday.


For the cakes (makes 12) you will need;


60g unsalted butter (room temperature)


1 medium egg
150g caster sugar
150g plain flour (sifted)
4 tsp red food colouring
3 tsp vanilla extract
20 cocoa powder
130ml buttermilk
150g plain flour
1.5 tsp bicarbonate of soda
1.5 tsp white wine vinegar

Cream the butter and sugar until well mixed, then add the beaten egg.  Add in the cocoa , colouring and vanilla extract until all well incorporated.  Add the flour bit by bit along with buttermilk a little at a time. Turn off the mixer and add the soda and vinegar so it fizzes, before giving it all a final mix.

Then spoon into the cases (or use an ice cream scoop which I always find perfect for the job).  Place in the oven at 170 degrees (non-fan assisted) for 20 minutes or until the sponge bounces back when touched.

Now at this point I looked into the oven and was thrilled with what I saw - the rise was perfect as was the colour, I let out of a squeal of delight......too soon as it turned out.  Disaster struck as I took them out and dropped the tray onto the oven door.  My perfect little cakes were now a pile of red mess squished beyond recognition!!  However, as every keen baker knows there are successes & failures, highs & lows....so in the bin and another batch were promptly whipped up and popped back in the oven.
A more successful second attempt they were put onto a wire rack to cool and finally I had cracked the colour issue - they were a lovely & vibrant red, I had finally managed the recipe which had first tempted me to take up baking.


For the frosting I used;


300g icing sugar (sifted)
50g unsalted butter (room temperature)
125g cold cream cheese (full fat)


Beat the icing sugar and butter together on a medium speed until well mixed.  Add the cream cheese and beat until fully incorporated.  Turn the mixer to high speed for approximately 7 minutes, the longer it's mixed for the more light and fluffy it will be.


They went to the office with me to spread a bit of Monday love (thus the little love heart decoration) and the compliments flew - "The best cupcake I've ever had" "Better than the Hummingbird Bakery" - all very kind and unexpected words but maybe that's the magic of the Red Velvet, it puts a smile on everyone's face and the happiness flows.....


Friday, 14 September 2012

My Love Affair continues....Individual Lavender Cakes


In the words of Shakespeare - "There are a few things I've learned in life; always throw salt over your left shoulder, keep rosemary by your garden gate, plant lavender in your garden and fall in love whenever you can". 

Clearly wise words that live on - I superstitiously throw spilt salt, there is rosemary at our garden gate, there is more lavender than I know what to do with in our garden and I fall in love every day with the world around me - maybe that's reflected in my need to 'Pin' inspiring images continuously.
So having felt compelled to find something useful to do with all this lavender and already  baked biscuits with it, which I posted on a couple of weeks ago ("The Scent of Summer - Lavender Biscuits") - I wanted to continue to my new found cooking love affair with this flower before autumn takes it from me until next Spring.
I was really pleased to settle down to Great British Bake Off a few days after first baking with lavender to see James using the very same in his Tarte Tatin recipe.
Maybe after all I wasn't alone in thinking that this wonderful scent shouldn't be consigned to Grandma's bathroom cabinet or muslin bags in wardrobes, perhaps it did have a place in the kitchen after all and it can be used subtly and not be not leave an over whelming perfume taste in our mouths and have us reaching for the nearest glass of liquid.  So, buoyed by this I decided this time to not use the actual flowers in the recipe but infuse milk.  I wanted to find a way to have the taste and scent of the lavender come through in both the sponge and the frosting, but without using the actual flowers in the recipe.
To be honest this was a bit of trial and error - I took a recipe I had and didn't have individual cake tins so I just baked in a large tin and then used a cookie cutter once the sponge had cooled.
The milk needs to be well infused, preferably overnight and I would recommend allowing some additional to the amount recommended in the recipe as the flowers do tend to absorb some of it.  Put milk and flowers into a container and cover and leave in the fridge.  Before using the milk strain with a sieve to remove the flowers.


For the sponge;

120ml whole milk
3 1/2 tablespoons dried lavender flowers
120g plain flour
140g caster sugar
1½ teaspoons baking powder
40g unsalted butter
1 egg


Put flour, baking powder, sugar & butter into the mixer and combine on a slow speed .  Add the strained milk slowly, once all well mixed add the egg and  continue to mix well on a medium speed.  Spoon the mixture into two greased & lined cake tins (20cm) and bake at 170 degrees (non-fan assisted) for 20 mins or until the sponge bounces back when touched.

Leave to cool for 5 minutes before removing from tins & peeling off grease proof paper and place on wire racks.  Once cool cut into desired shape and decorate.

For the frosting;

25ml whole milk
1 tablespoon dried lavender flowers
250g icing sugar
80g unsalted butter


Sift the icing sugar and add the butter - mix together on a medium speed until combined.  Then add the milk & vanilla extract slowly while still mixing.  Once done turn the mixer onto a high speed and continue for 5-7 minutes.  Add food colouring if desired, I think the lavender colour just adds to the effect. Then decorate as you want.....

Looked lovely served on a vintage cake plate on a Sunday afternoon, and so small that it would be rude to only eat one.


Perfect with an espresso.....


Friday, 31 August 2012

The Curse of OCD .....Crunchy Peanut Butter & Dark Chocolate Cookies

Faced with a bank holiday weekend I had promised myself that I would spend an afternoon giving the kitchen cupboards a long overdue sort out, yes life in the fast lane for me and clearly harbouring a deep seated desire to be more like Bree Vandercamp. I'd put it off for 2 days seeing friends, going to a movie, picking up a book I'd been meaning to read for ages and over walking the poor dog.  

But on Saturday it rained, stuck in doors there was was no excuse and secretly I do have a little bit of OCD in me.  Whilst I think housework is a thankless task, I find something very satisfying about re-arranging and throwing out, then standing back admiring how neatly stacked everything is and at last  cake stand or slow cooker can now be used again because I don't need to empty the entire contents of a cupboard onto the kitchen floor to reach it.

If it was out of date I binned it.... I scrubbed and re-arranged and found myself left with one solitary annoying jar of crunchy peanut butter - still in date and unopened but when am I ever going to use it?  

You see me and peanut butter don't really see eye to eye - I'm not a fan! I have never understood the attraction of plastering it on toast and then having it sticking to the roof of your mouth like polyfilla....so not wanting to waste I thought I must be able to find something to do with it to make it more palatable for my taste.

I figured that used in a biscuit and combined with a dark chocolate the flavour would be more subtle and that  a crunchy peanut butter would give a more interesting texture.  I trawled through my faithful stack of recipe book and settled one from http://hummingbirdbakery.com/cookbooks/the-hummingbird-bakery-cookbook/ 


I halved the suggested amounts to make 12;

Ingredients:

112g unsalted butter
100g caster sugar
100g light brown sugar
1 egg
1/4 teaspoon good quality vanilla extract
120g crunchy peanut butter
170g plain flour
1 1/4 teaspoons bicarbonate soda
1/4 teaspoon salt
40g plain chocolate, roughly chopped (personally Green & Blacks dark cooking chocolate)

Pre-heat the oven to 170 degrees C (non fan assisted)

Put butter & sugars in the mixer with paddle attachment and cream until light & fluffy.  Add the egg and mix well, then turning the mixer to a slow speed and the vanilla extract and peanut butter.

Next add the flour (sifted), bicarb & salt - continue mixing until you obtain a smooth dough.  Finally stir in the chocolate by hand.  Arrange 6 equal amounts of the cookie dough on a baking tray lined with greaseproof paper and ensure you allow space for spreading.  Bake for approximately 10 minutes until golden brown on the edges and quite flat.  Leave on the tray to cool slightly before moving to a cooling rack.

These have gone down a storm this week with everyone who has popped round, myself included suprisingly - soft & chewy, great with a cup of coffee.  Suddenly peanut butter tastes good, it's not dry and when cut through a cookie dough with the melted dark chocolate it's a completely different taste.  

One jar put to good use and me and peanut butter in a happier place and I'm not resenting it taking up space in my kitchen now!

Sunday, 26 August 2012

The scent of summer - Lavender Biscuits

The two main motivators for moving out of London were firstly to have more outside space, which in turn meant fulfilling reason number 2 - get the dog I had longed for.  The trade off - a longer commute but the upside being able to walk my dog in the summer evenings and plant my own vegetables, a stark contrast to the hustle and daily grind in London, and maybe deep down a secret hankering after the 'good life'.  So it's that time of year when most of the vegetables lovingly planted and watered all summer are ready......what is it that makes us spend months tending to a plant, waiting to pick and cook with it, when you know you could've popped to the supermarket and chosen the same thing off the shelf on any day.  This year a lack of time has meant sticking to a few basics  -tomatoes (black russian & fandango), cucumber,chilli,and the usual stock of herbs.  There's something about wandering down the garden and realising the first tomatoes are ready or seeing that chilli turn a ripe red on the window sill - it's a sense of achievement,  an accomplishment of patience.  

I realised this weekend the one other plant we have an abundance of in the garden is lavender and yet I've always overlooked it to cook with.  I love this plant in all it's varieties, and have spent the past few years filling borders and pots with every type I can find.  Not sure if it's the vivid colour or the scent that carries on the breeze as I walk through the front gate.  It's just speaks of summer to me - like havianas, ice-cream, mojitos, freshly cut grass and BBQ's.

So I thought I'd play around with some ideas and try baking biscuits, always keen to add to my baking skills and try something new.....felt a little strange pulling apart flowers to use to cook but the smell that filled the kitchen was heavenly.  


Fancy having a go then follow the recipe below;

110g unsalted butter
55g caster sugar
170g plain flour
1 1/2 tbsp fresh lavender flowers - removed from the stem 
Oven at 190 degrees C (non-fan assisted)

1. Put butter and sugar into the mixer and cream until light & fluffy
2. Add in the sifted flour and lavender and slowly bind in a ball, I find working by hand easiest.  Then cover and put in the fridge for 30 minutes.
3. Roll out onto floured surface, and using a biscuit cutter (whatever shape you fancy) cut out your biscuits.  Place onto greaseproof paper and bake for approx. 10-12 mins until just golden at the edges.
4. Leave to cool slightly and transfer onto a wire cooling tray 

Pretty happy with how these turned out for a first go - the taste and the smell of the lavender is good and not overpowering, and now feeling inspired to make a lavender infused milk to use in my next batch of cupcakes (will let you know how I get on) - any other ideas for using lavender in baking welcome.  

Sunday, 29 July 2012

Realtime Facetime - The Original Social Network?

Having recently spent a wonderful two weeks with my best friend who was visiting from Australia, I was asked last week at a wedding what we had got up to during our time together – as I re-called the fantastic experiences we’d had including watching Henry V at the Globe, a trip to Rome and a great meal at my favourite Heston pub in Bray, I realised that we’d also spent an in-ordinate amount of time drinking coffee.


I think one of the reasons for this is I miss our face time - normal communication is email, social networking and Skype (once I've managed to calculate the correct time difference!) In this age of the internet and all things digital it's so easy to have an evening with our on-line community of friends from the comfort of the sofa.  Case in point being Friday night watching the amazing Opening Ceremony of the Olympics - I spent half the night watching the TV and the other tweeting my views and emotions.

You can chat on Facebook, 'like' what everyone else has been up to, tweet away the hours and create your perfect fashion 'wish list' on Pinterest.  We have more communication options available to us and yet more of the population admit to feeling lonely than ever before.

I'm as guilty as anyone of this and with our busy lives - juggling work, home, social commitments, family and commuting - it is so much easier to take a quick look on-line at what our friends have been up to than to pick up the phone or make the time to meet up. I admit to being one of the 70% who suffer a level of anxiety when parted from my phone.  I love fact that I can so easily make all my arrangements on-line at my convenience.

As great as all this technology is do we run the risk of forgetting the importance of sitting down with a friend face to face?  I'm not talking about alcohol fuelled nights out or dinner that take up a whole evening, just a good quality catch up where we can offload, laugh and realise that everyone's is juggling responsibilities and life isn't perfect for anyone!  Our Facebook profiles gloss over the nitty gritty and mundane parts of everyday life - according to our on-line lives everything is perfect and we are all super busy having a great time!

Finding a great Coffee shop and sitting down in a quiet environment without the interruption of a mobile or the distraction of a laptop can be fulfilling, a chance to jump off the hamster wheel, - to fully focus your attention on a friend and the conversation in hand.  You can see the emotion on their face - is everything really going well or do they need a confidante or a shoulder to cry, does that smile mean they have exciting news to share?  

We can slot it into our day between work, running errands.....grab a coffee before work, whilst out shopping or drop into a friend's house on the way home with take out cappuccino!

So in this time where everyone seems to be coming together as a nation to support Team GB in their quest for gold - pick up the phone (or send a message via Facebook or text!) and arrange to meet a friend, it only needs to be 30 minutes, and I bet it really makes their day......

Tuesday, 17 July 2012

Rule Britannia - Patriotism or cashing in on a Diamond Year?


Whilst out recently I wandered into a coffee shop and ordered my usual…..absorbed in conversation with a friend I only looked up when I heard “skinny cappuccino” shouted out by the barista, at which point I was greeted with foam covered in a giant chocolate union jack flag!  Now this made me smile on an already great day but got me thinking has this year brought out our extreme patriotism or is every company just using it as an excuse to jump on the bandwagon to tug on our marketing heart strings and boost their coffers?
The steady rise in all things ‘British’ can’t have been missed in this bumper year of excuses to celebrate all things great and good about this fine nation – what with the Diamond Jubilee and the Olympics!  At last, the waiting over, a Brit in the final at Wimbledon – the nation held its collective breath in anticipation……
You can’t escape the current onslaught – every advert and window display is an Olympic reference or a riot of union jack flags and oversized cardboard medals.  There’s doesn’t seem to be a company out there not latching on to the great 2012 marketing opportunity but is this a bad thing?  Will we all suffer ‘Jingoistic’ fatigue before the Olympic flame is extinguished or is it a great chance for  companies to boost their profits and the economy, whilst the public enjoy a lift in their spirits during in one of the wettest ‘summers’ on records during these times of austerity.


Is there a business that isn’t marketing itself using even the most  tenuous link to the Olympics,  shouting out that it’s a sponsor for the biggest sporting event this country has ever seen, to pottery and porcelin celebrating 60 years on the throne.  Everyone’s getting in on the act with even the high end brands giving their products a facelift for this historic year – think Mulberry and their classic Bayswater now with a union jack on the clasp face and Links doing a roaring trade by allowing you to design your own Wimbledon or Olympic bracelet.
I guess the more cynical amongst us (or perhaps the realists?) would say it’s all just a big marketing ploy – which of course it is.  Case in point I found myself almost buying some Beefeater gin at the airport last week even though I don’t drink it just because I loved the shiny red bottle with ‘Made in London’ written down the side.  I like to take the ‘glass half full’ viewpoint - I think it’s made the companies raise their game.  We live in a world where consumers are harder than ever to impress, they have so much choice and the landscape of advertising is changing constantly.   Over the past few months I’ve seen some phenomenal marketing, and window campaigns that have made me stop and take photos, so if a ‘patriotic’ cappuccino can put a smile of my face then I say 2012 is a great year to feel proud to be British.